
A few months ago I wrote this post about managing some Internet Explorer setting with the use of Microsoft Intune. I described how to disable the First run wizard, how to set the Home Page and how to add websites to the Intranet Zone using the Zone assignments list. In this new post of Manage Internet Explorer settings I will show you how to set some security settings in IE11 for safer browsing.
Enable Enhanced Protected Mode
The first security setting I will show is Enable Enhanced Protected Mode. As showed in the previous post, the first thing we need to do is lookup the CSP Policy we need. In this list with CSP Policies you will find al CSP Policy for Internet Explorer. Search for the corresponding policy AllowEnhancedProtectedMode. It shows us you can set this policy as a User or Device Configuration policy (see Scope), describes what you can accomplish with the policy and the ADMX info.
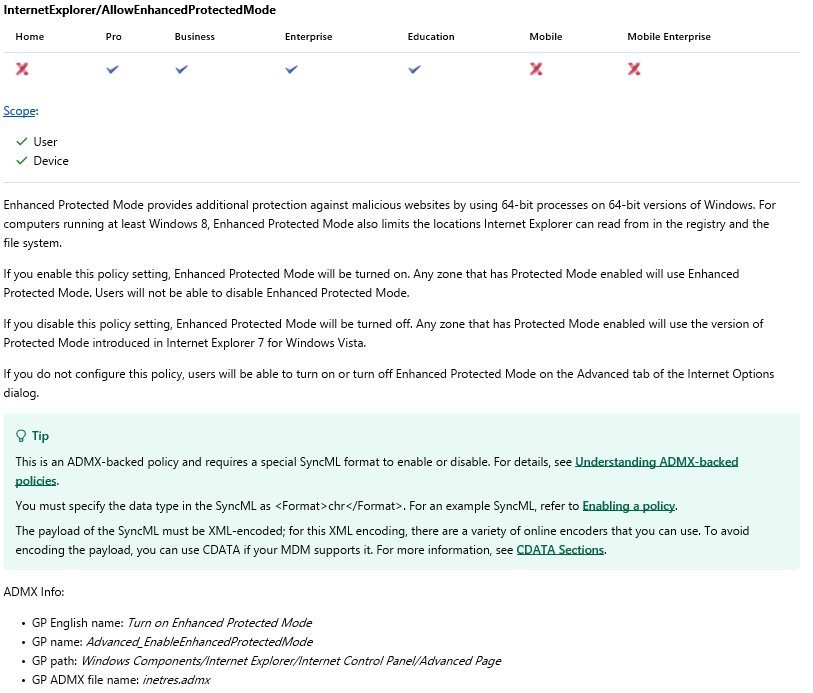
ADMX Info:
GP English name is the corresponding GPO name.
GP name is the corresponding GPO name which can be found in the corresponding ADMX file
GP Path is the path to the GPO
GP ADMX file name is corresponding ADMX file which can be found in %SystemRoot%\policydefinitions
In File Explorer browse to C:\Windows\Policydefinitions (%SystemRoot%\policydefinitions) and open the corresponding admx file, in this case that is the inetres.admx file. Search for the GP name; Advanced_EnableEnhancedProtectedMode to find the policy we need, with the required information to setup our Intune policy. We need the information of the EnabledValue, because we need to enable this settings in Internet Explorer.

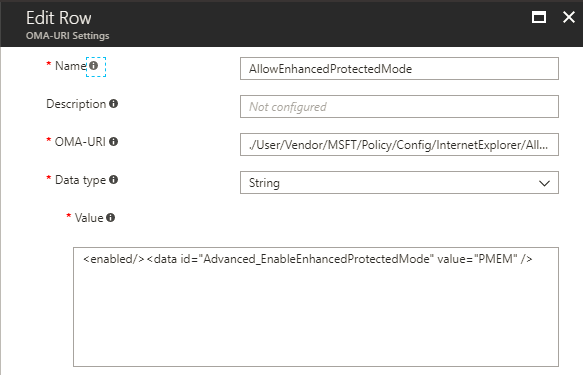
Switch to the Azure Portal and create a Custom Intune Configuartion Policy for the platform Windows 10 and later. We add a row with the information we found in the list of CSP Policies in the OMA-URI field and the information we found in the inetres.admx file in the Value field.
Add the OMA-URI: ./User/Vendor/MSFT/Policy/Config/InternetExplorer/AllowEnhancedProtectedMode As data type you choose string. And in the value field you enter: <enabled/><data id=”Advanced_EnableEnhancedProtectedMode” value=”PMEM”/>
The first part of the value is enabled, because we need to enable this setting. The data_id is (in this case) equal to the policy name and the value, is the value we found as enabledValue (PMEM) in the inetres.admx file.
We save the policy and assign it to a user group if the OMA-URI starts with ./User or to a device group when it starts with ./Device. For this policy we could choose ourselves to set it as a user or device policy.
Now perform a sync on your (test) device or from the Intune portal and open up the Internet Explorer settings on your device. Open the Advanced tab and scroll down. Enable Enhanced Protected Mode is checked and greyed out, the policy is set!
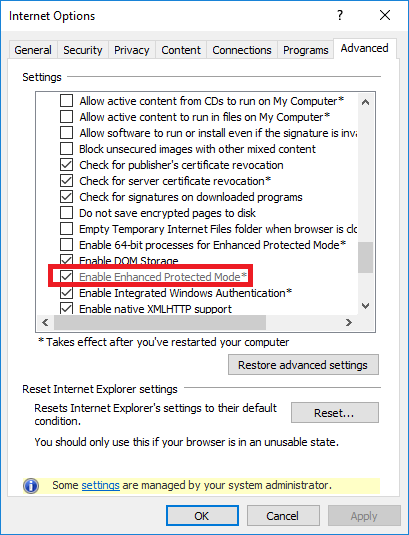
We only need to restart the computer for the setting takes effect.
Enable Windows Defender Smartscreen
The next security settings is Enable Windows Defender Smartscreen. The policy we are looking for is PreventManagingSmartScreenFilter. As you can read in the information we need to enable this policy setting to take effect, when we disable the setting it`s the users decision how Smartscreen is configured.

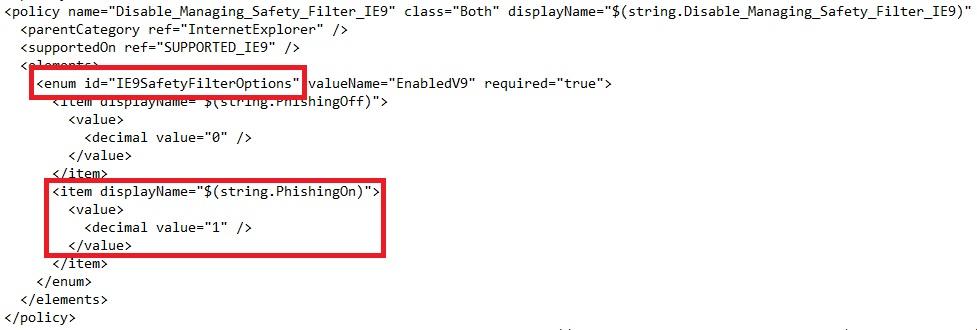
Again the information we need is found in the inetres.admx file. We have a enum id we set as data id in the Intune policy and we have two options we can set when we enable the policy. The option we need to use is described with displayname PhisingOn and has value 1.
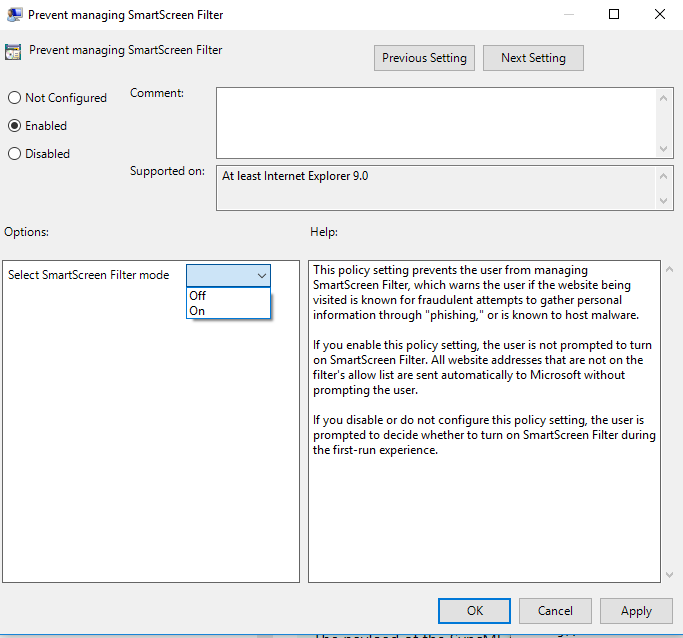
To see what these two options mean we can open Group Policy editor on a Windows 10 device and open the policy Prevent managing SmartScreen Filter under Windows Components\Internet Explorer. When we enable the policy, we prevent the user from managing SmartScreen Filter and we decide if Filter mode is turned Off (value 0) or On (value 1)
Now let`s use the information we gathered to create a Intune configuration policy.
The OMA-URI is ./User/Vendor/MSFT/Policy/Config/InternetExplorer/PreventManagingSmartScreenFilter
In the value field fill in <enabled/><data id=”IE9SafetyFilterOptions” value=”1″ />

Again we had the choice to set it as a device or user policy, in my example I used ./User and I assigned the policy to a user group.
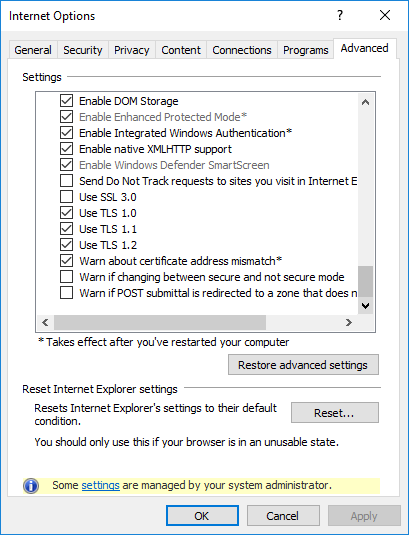
After a new sync, open the IE Settings and scroll down on the Advanced tab. Both Enable Enhanced Protected Mode (we set with the previous setting) and Enable Windows Defender SmartScreen is checked.
Check for server certificate revocation
The next security setting I want to show is Check for server certificate revocation. When we lookup this setting in the CSP Policy list we can see we should enable this setting.
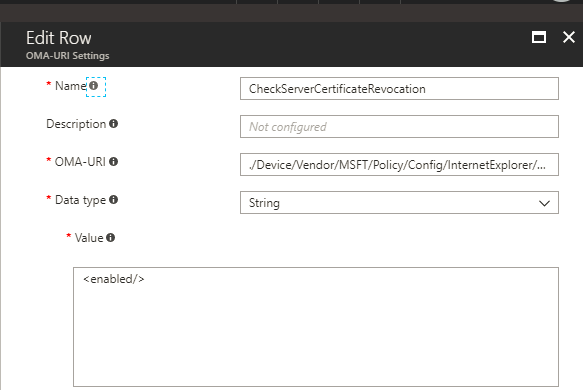
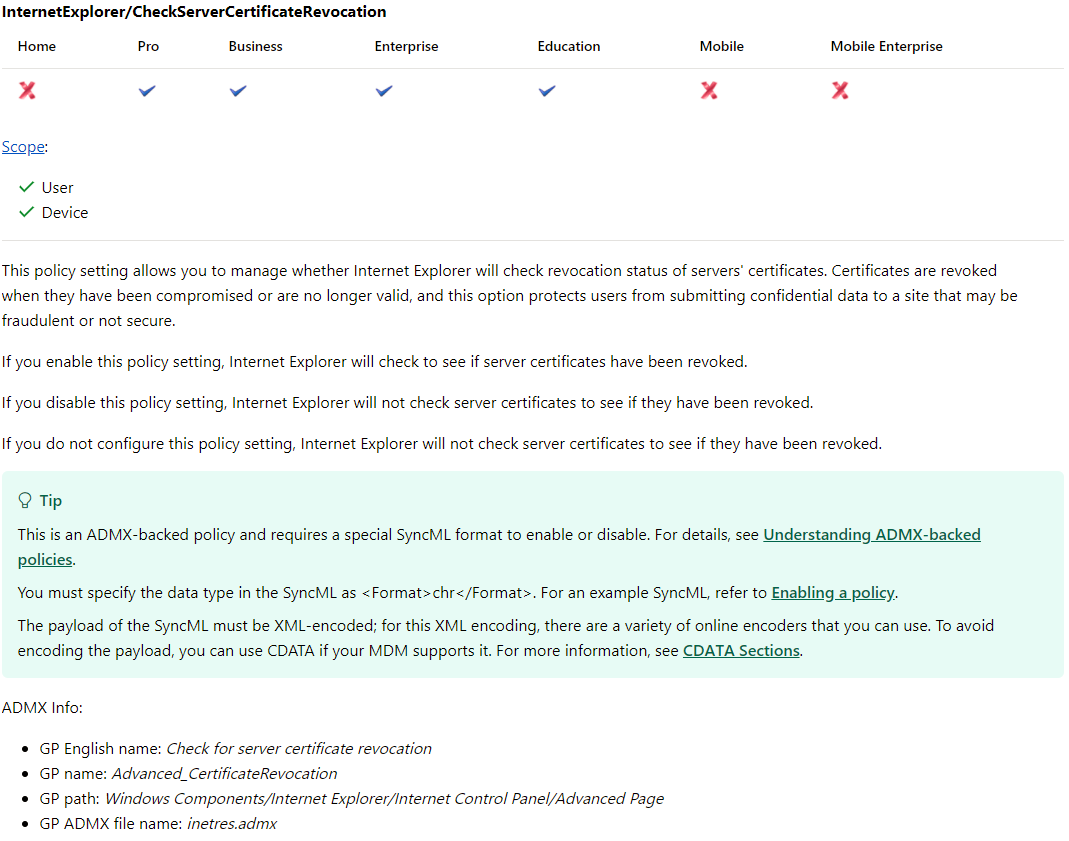 When you open the inetres file, you see there are no supplementary settings to set set, just enable or disable. Because of this, setting the policy is quiet simple, just put <enable/> in the value box.
The OMA-URI is ./User/Vendor/MSFT/Policy/Config/InternetExplorer/CheckServerCertificateRevocation
In the value field fill in <enabled/>
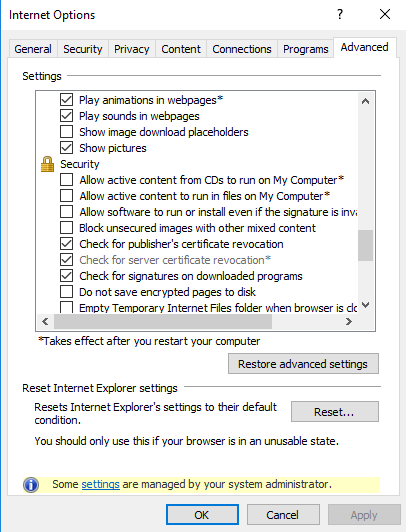
After a Intune sync, we see Check for server certificate revocation is enabled and greyed out.
Turn off Auto complete feature
I want to prevent my users to save the username and password in IE because those can be stolen by malware. We search in the list for AllowAutoComplete to find the information as you can read below.

Because I want this option to be disabled I will not have a look at the inetres file for more information, I just set the value to disabled in the Intune policy as you can see below.
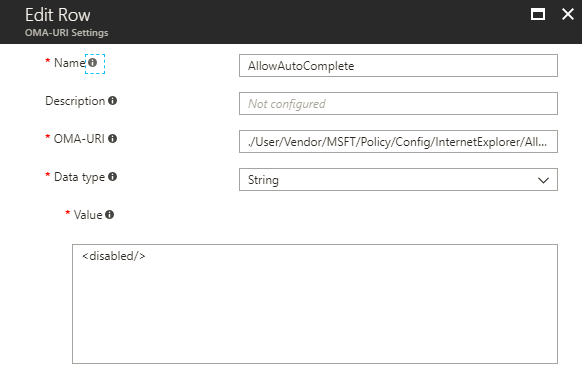
The OMA-URI is ./User/Vendor/MSFT/Policy/Config/InternetExplorer/AllowAutoComplete
In the value field fill in <disabled/>
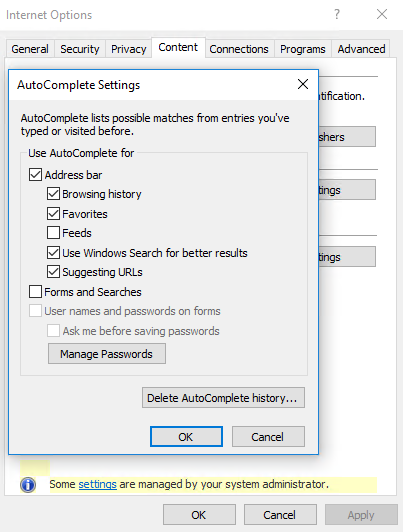
In the IE settings on the Content tab click on settings near Auto Complete. As you can see the options User names and passwords on forms and Ask me before saving passwords are unchecked and greyed out, which prevents users to save the username and password to the browser.
Disabled Allow Fallback to SSL 3.0
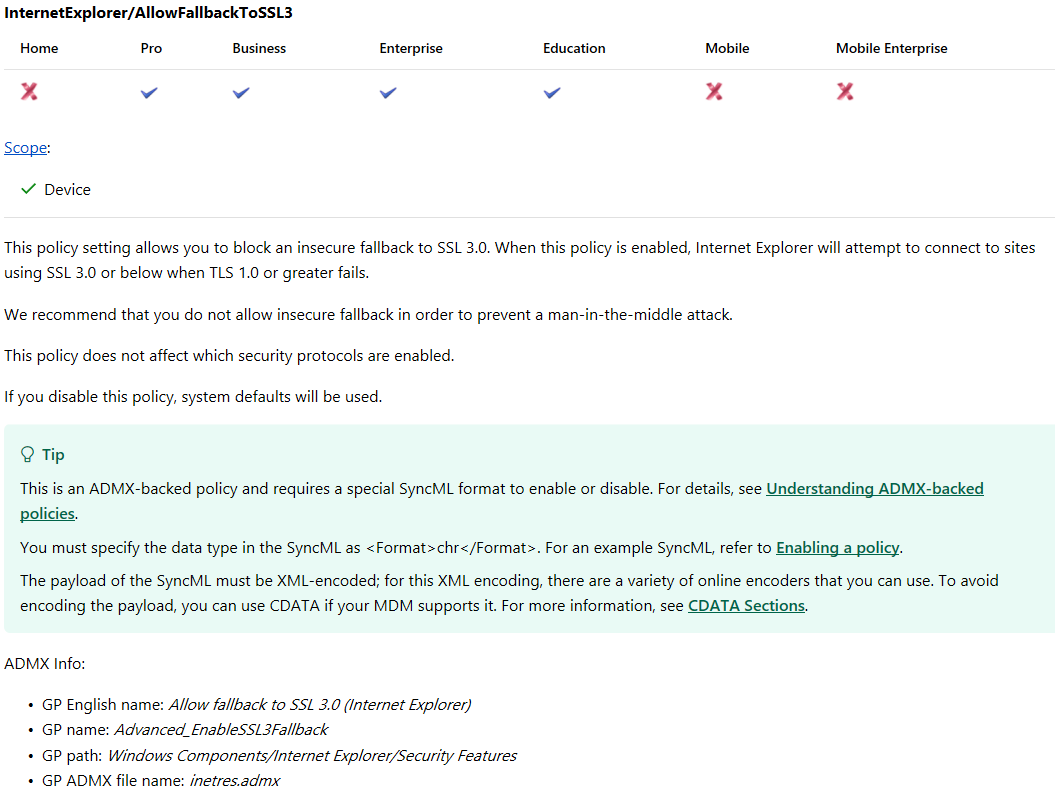
Another security setting we can set is preventing the fallback to the older SSL 3.0 protocol. By default this protocol isn`t turned on anymore in IE11, but to prevent users to turn this protocol on we can use this policy.
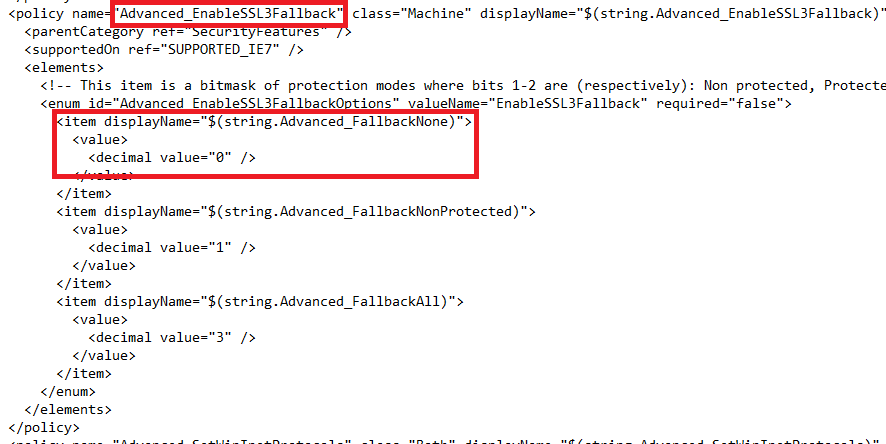
When we have a look at the policy AllowfallbackToSSL3 we can see we need to enable this policy, because when we disable the policy it uses the system default. Let`s have a look at the inetres file and search for Advanced_EnableSSL3Fallback.
In the inetres file we see we have three options when we set the policy to enabled. FallbackNone, FallbackNonProtected and FallbackAll. We will set the policy to FallbackNone, in the Intune policy we need enable the policy with value 0. The value of enum id we need to set in the policy as data id.
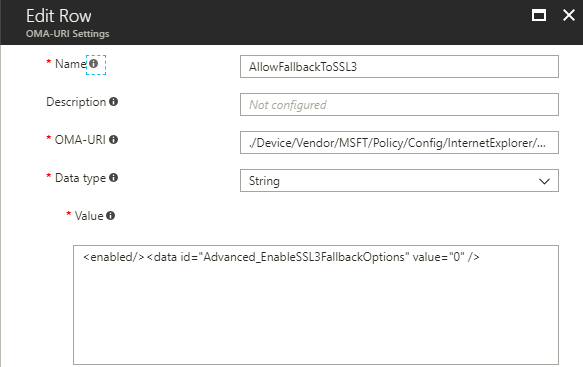
Now open the Intune console in the Azure portal and create a custom configuration policy.
The OMA-URI is ./User/Vendor/MSFT/Policy/Config/InternetExplorer/AllowFallbackToSSL3
In the value field fill in <enabled/><data id=”Advanced_EnableSSL3FallbackOptions” value=”0″ />
This time I will use the Advanced Diagnostic Report to see if the policy is set. From the same page in Settings from which you can perform a manual sync with Intune allows you to create a report (scroll down to the end of the page). When you click Create report, a report is saved in C:\Users\Public\Documents\MDMDiagnostics.
Open the report and search for AllowFallbacktoSSL3. Here you can see the policy is set to enabled with value 0

If you have a question about a setting discussed in this article or you think I should show another Internet Explorer security setting, please leave a comment or feel free to send me an email.

Be the first to comment